I’m going to be straight with you. Building a budget PC in 2026 is harder than it was a year ago. RAM prices have tripled. SSDs cost more than they should. And the whole “just build it yourself to save money” advice everyone loved throwing around? It’s getting complicated.
But here’s the thing – it’s still possible. And it’s still worth doing.
I just finished helping my younger brother build a gaming PC for under $700. We had some frustrating moments, like when we discovered that 16GB of DDR4 RAM now costs what 32GB did six months ago. But we made it work, and his system runs Fortnite at over 200 FPS.
This isn’t going to be one of those guides that pretends everything is perfect. I’m going to tell you exactly what’s annoying right now, which parts are actually worth buying, and where you can cut corners without destroying your gaming performance.
What Changed in 2026 (And Why Your Wallet Feels It)
Let me walk you through what’s actually happening in the PC parts market right now. This matters because understanding the “why” helps you make smarter buying decisions.
The biggest problem is memory. Not your GPU’s VRAM – I’m talking about system RAM and SSDs. Prices went completely sideways starting around June 2025. Why? The companies that make memory chips (SK Hynix, Samsung, Micron) decided they’d rather sell to massive tech companies building AI data centers than to regular people building gaming PCs.
The result is brutal. DDR4 RAM that cost $45 for 16GB in early 2025 now runs about $99. DDR5 is even worse. I watched a 32GB kit jump from $110 to $280 in three months.
SSDs followed the same pattern, though not quite as dramatically. A decent 1TB NVMe drive that was $60 is now closer to $80-90. Not devastating, but it adds up when you’re already stretching a budget.
Quick Reality Check: The same component selection that cost $479 in February 2024 now costs around $668. That’s a 40% increase in less than two years, and most of it happened in the last six months.
On the positive side, CPUs and GPUs have held relatively steady. AMD’s Ryzen 5000 series chips are actually cheaper now than at launch. Intel’s Arc B-series graphics cards offer genuinely good value for 1080p gaming. The platform components (motherboard, case, power supply) haven’t changed much in price.
So here’s the strategy: we’re going to be extremely smart about RAM and storage selection, while taking advantage of solid prices on processors and graphics cards.
What “Budget” Actually Means in 2026
I need to set realistic expectations before we dig into parts. When I say “budget PC build 2026,” I’m talking about a system that costs between $600 and $900 for the tower itself. This doesn’t include your monitor, keyboard, mouse, or speakers.
Here’s what you can actually expect from a budget build in this price range:
What You’ll Get
- Smooth 1080p gaming at medium to high settings
- 144+ FPS in competitive games like Fortnite, Valorant, CS2
- 60+ FPS in demanding single-player games
- Fast system responsiveness with NVMe storage
- Ability to stream to friends or record gameplay
- Solid upgrade path for future improvements
What You Won’t Get
- 4K gaming (that’s $1500+ territory)
- Maxed-out ray tracing in AAA games
- 240+ FPS in demanding titles
- Excessive RGB lighting everywhere
- Premium build materials
- Whisper-quiet operation under load
The key word here is “playable.” Your games will run well. You’ll have fun. But you’re making deliberate tradeoffs to hit a price target.
Before you start buying parts, I strongly recommend checking component compatibility and performance balance. I use a bottleneck calculator before finalizing any build. It takes two minutes and can save you from pairing a powerful CPU with a GPU that can’t keep up, or vice versa.
Test Your Build Balance
Before you buy anything, make sure your components work efficiently together. A mismatched CPU and GPU wastes money and performance.
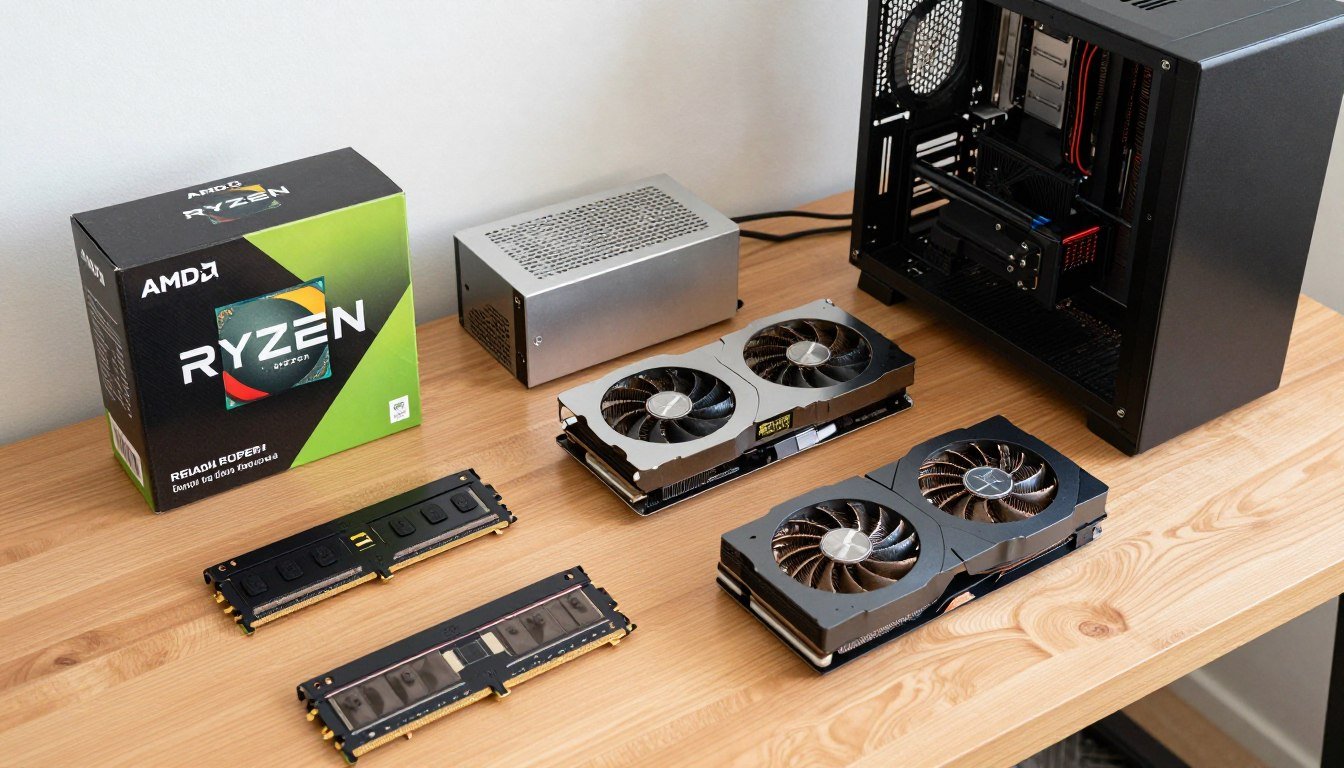
The $650-$700 Build: What I’d Actually Buy Right Now
This is the build I helped my brother put together last month. It’s not fancy, but it works. More importantly, every component choice has a reason behind it.

The Complete Parts List
| Component | Part Selection | Price | Why This Choice |
| CPU | AMD Ryzen 5 5600 | $130 | 6 cores handle modern games, DDR4 avoids expensive DDR5 |
| Motherboard | MSI B550M PRO-VDH WiFi | $100 | Built-in WiFi, PCIe 4.0, future CPU upgrade options |
| RAM | 16GB DDR4-3600 (2x8GB) | $65 | Best speed-to-cost ratio, dual-channel essential |
| GPU | Intel Arc B570 10GB | $200 | Excellent 1080p performance, 10GB VRAM future-proofs |
| Storage | Kingston NV2 500GB NVMe | $40 | Fast boot and loading, add more storage later |
| Power Supply | EVGA 550W 80+ Bronze | $50 | Reliable brand, sufficient wattage, basic efficiency |
| Case | Deepcool CC560 | $55 | Good airflow, easy to build in, includes fans |
| CPU Cooler | Stock AMD Wraith Stealth | $0 (included) | Free, adequate for this CPU |
| Total | $640 |
Why These Specific Parts
Let me explain the logic behind each component, because blindly copying a parts list without understanding it is how people waste money.
The CPU Decision: Ryzen 5 5600
The Ryzen 5 5600 is three years old at this point, but that’s exactly why it works for a budget build. The price has dropped to $130, and it’s still a capable gaming processor.
Six cores is enough for any game in 2026. You’re not going to be CPU-limited in most gaming scenarios. More importantly, this CPU uses DDR4 memory instead of DDR5, which saves you $80-100 on RAM alone.
The alternative would be something like the Ryzen 5 7600, which is faster but requires a more expensive motherboard and DDR5 RAM. For a strict budget build, that math doesn’t work out.
Motherboard: MSI B550M PRO-VDH WiFi
This is one area where I wouldn’t go cheaper. The MSI B550M PRO-VDH WiFi costs $100, but it includes built-in WiFi (saves $20-30 on a separate adapter) and has decent VRM quality for the Ryzen 5 5600.
It also supports PCIe 4.0, which matters for your SSD speed and gives you options if you upgrade to a newer GPU down the road. Some budget boards only have PCIe 3.0, which limits your flexibility.
The WiFi inclusion is huge. My brother’s desk is nowhere near his router, and running an Ethernet cable wasn’t practical. Built-in WiFi solved that problem without buying a separate adapter that takes up a slot.
RAM: The Painful Reality
This is where building in 2026 hurts. 16GB of DDR4-3600 now costs $65. Six months ago, I paid $42 for the same thing.
I went with a 2x8GB kit instead of 1x16GB for a crucial reason: dual-channel memory. Running RAM in dual-channel mode (two sticks) instead of single-channel (one stick) dramatically improves gaming performance. We’re talking 20-30% better frame rates in many games.
Speed-wise, DDR4-3600 is the sweet spot for Ryzen 5000 series CPUs. Going to 3200MHz saves maybe $5 and loses a few FPS. Going to 4000MHz costs $20 more and gains almost nothing.
The tough call is capacity. 16GB is tight in 2026. Some newer games like Hogwarts Legacy and Star Wars Jedi Survivor recommend 32GB. But doubling to 32GB means spending $130 instead of $65, which blows the budget.
My advice: start with 16GB and plan to add another identical 2x8GB kit later when prices (hopefully) come down. The board has four RAM slots, so you have room to expand.
RAM Installation Tip: Use slots 2 and 4 (counting from the CPU). Check your motherboard manual, but this is standard for enabling dual-channel mode. I’ve seen multiple first-time builders use slots 1 and 2 and wonder why their performance sucks.

GPU: Intel Arc B570 10GB
This is my favorite pick in this build. The Intel Arc B570 costs $200 and punches way above its weight class for 1080p gaming.
Intel’s Arc series had a rough launch in 2022, but they’ve fixed most of the driver issues. The B570 consistently delivers 60+ FPS in demanding games like Cyberpunk 2077 at high settings. In esports titles, you’re looking at 200+ FPS.
The 10GB of VRAM is a big deal. Most $200 GPUs have 8GB, which is already showing its age in some games. Having 10GB gives you breathing room as games get more demanding.
If you want an alternative, the AMD RX 7600 is slightly faster in some games and costs about the same. I went with the B570 because Intel is currently running a promotion where you get a free game with purchase, and the extra VRAM matters to me.
Storage: Kingston NV2 500GB
Storage is another area that got more expensive. The Kingston NV2 500GB costs $40 now, up from $30 a year ago.
500GB is tight. Windows takes 30GB. A few modern games eat 100GB each. You’ll fill this up quickly.
But here’s my logic: storage is the easiest thing to add later. You can throw in a $50 1TB SATA SSD or even a hard drive for game storage down the road. Starting with a fast NVMe boot drive keeps your system responsive, and you’re not locked in like you are with CPU/motherboard platform choices.
The Kingston NV2 is a budget NVMe drive that’s fast enough. It’s not going to win any benchmark competitions, but you won’t notice the difference between this and a premium Samsung 990 Pro in real-world gaming.
Power Supply: Don’t Cheap Out Here
The EVGA 550W 80+ Bronze costs $50. I’ve seen $35 power supplies that technically provide 550W, but I wouldn’t trust them to power a light bulb, let alone a gaming PC.
A bad power supply can destroy every other component in your system when it fails. This is not the place to save $15.
EVGA is a reputable brand. 550W is more than enough for this build (the system pulls maybe 300W under full load). 80+ Bronze efficiency is basic but acceptable.
The cables aren’t modular, which means cable management is slightly more annoying, but it’s manageable. Modular power supplies start around $70, and that $20 difference matters in a budget build.
Case: Deepcool CC560
The case is where you can actually save money without hurting performance. The Deepcool CC560 costs $55 and does everything you need.
It has a mesh front panel for good airflow. It includes three fans (one rear, two front) so you don’t need to buy extra fans immediately. It has basic cable management features behind the motherboard tray.
Is it pretty? Not particularly. Does it have tempered glass? No, just an acrylic side panel. But your components stay cool and it’s easy to build in, which matters way more than looks.
CPU Cooler: Stock is Fine Here
The Ryzen 5 5600 comes with AMD’s Wraith Stealth cooler. It’s not amazing, but it’s adequate for a CPU that doesn’t run particularly hot.
My brother’s system idles around 35-40°C and hits maybe 70°C under gaming load. That’s perfectly safe. The fan can get a bit loud under heavy load, but with headphones on, you won’t notice.
If you want quieter operation later, a $25 tower cooler like the Thermalright Assassin X 120 SE makes a nice upgrade. But for launch, save the money.
Performance Expectations
Here’s what this build actually delivers in real games, based on my brother’s system:
- Fortnite (Performance mode, 1080p): 200-240 FPS
- Valorant (High settings, 1080p): 250+ FPS
- Cyberpunk 2077 (High settings, no RT, 1080p): 55-65 FPS
- Call of Duty (High settings, 1080p): 100-120 FPS
- League of Legends (Max settings, 1080p): 200+ FPS
- Baldur’s Gate 3 (High settings, 1080p): 60-75 FPS
These are real-world frame rates, not best-case scenarios. Your actual performance will vary based on specific settings and what else is running in the background.
Complete Budget Build
Ready to build this exact system? Check current component prices and availability from major retailers.
Total Cost: ~$640
Performance: Solid 1080p gaming
Upgrade Path
This build has room to grow. Add more RAM, a bigger SSD, or upgrade to a Ryzen 5800X3D later.
Next upgrade: Add 16GB more RAM
Future GPU: Supports up to RTX 4070 class
Component Deep Dives: What Actually Matters
Now that you’ve seen the complete build, let me break down the key decision points for each component type. This is the stuff that matters when you’re comparing options or considering substitutions.
CPU: Platform Decisions and Trade-offs
The CPU choice dictates your entire platform – motherboard, RAM type, upgrade path. This is the most consequential decision in your build.
For budget builds in 2026, you have three main paths:
AMD AM4 (Budget)
CPUs: Ryzen 5 5600, 5700X
RAM: DDR4 (cheaper)
Pros: Cheapest entry point, mature platform
Cons: No future CPU upgrades, PCIe 3.0 on some chips
Best for: Strict budget, no upgrade plans
AMD AM5 (Future-proof)
CPUs: Ryzen 5 7600, 7600X
RAM: DDR5 (expensive)
Pros: Long upgrade path, modern features
Cons: Higher upfront cost, DDR5 premium
Best for: Planning to upgrade CPU later
Intel LGA1700 (Middle Ground)
CPUs: Core i5-12400F, 13400F
RAM: DDR4 or DDR5 options
Pros: Flexible RAM choice, good performance
Cons: End of socket life, limited upgrades
Best for: Want flexibility now
My recommendation for most budget builders: stick with AM4 and DDR4. The money you save on the platform more than makes up for the lack of upgrade path. When you eventually want to upgrade in 3-4 years, you’ll probably rebuild the whole system anyway.

GPU: The Performance Bottleneck
Your graphics card determines gaming performance more than anything else. This is where budget builds make the biggest compromises.
At the $200-250 price point, here are your realistic options:
| GPU Model | Price | VRAM | 1080p Performance | Key Advantage |
| Intel Arc B570 | $200 | 10GB | Excellent | Most VRAM at this price |
| AMD RX 7600 | $250 | 8GB | Excellent | Mature drivers, reliable |
| NVIDIA RTX 4060 | $270 | 8GB | Very Good | DLSS 3, best efficiency |
| AMD RX 6650 XT | $230 | 8GB | Very Good | Good value on sale |
The VRAM situation is something I think about a lot. Games are starting to use more than 8GB of video memory at high settings, even at 1080p. We’re not at crisis point yet, but in 2-3 years, 8GB cards might struggle with new releases.
That’s why I like the Arc B570. Ten gigabytes gives you headroom. Intel’s driver situation has improved dramatically since their rough 2022 launch. I haven’t had any issues with the B570, and it performs like a card that should cost $50 more.
If you’re nervous about Intel GPU drivers, the RX 7600 is a rock-solid alternative. AMD’s drivers are mature and stable. You lose 2GB of VRAM, but you gain peace of mind.
RAM: Speed, Capacity, and the Dual-Channel Requirement
RAM is frustratingly expensive right now, but there are still smart ways to approach it.
For DDR4 systems (which I recommend for budget builds), here’s what matters:
- Capacity: 16GB minimum, 32GB ideal (but expensive)
- Speed: 3200MHz acceptable, 3600MHz optimal for Ryzen
- Configuration: Always 2x8GB, never 1x16GB
- Latency: CL16 or CL18 fine, don’t overpay for CL14
The dual-channel thing is critical. I can’t stress this enough. Single-channel RAM absolutely murders gaming performance. We’re talking 20-40% FPS loss in CPU-limited scenarios.
I’ve seen too many people buy 1x16GB because it’s $5 cheaper than 2x8GB, then wonder why their system feels slow. Don’t do this. Always buy a matched pair.
For speed, Ryzen benefits noticeably from faster RAM because the CPU’s internal Infinity Fabric speed is linked to memory speed. DDR4-3600 is the sweet spot. Going to 3200MHz loses a few percent performance. Going to 4000MHz costs way more for minimal gains.
Memory Compatibility: Not all RAM runs at advertised speeds automatically. You need to enable XMP (Intel) or DOCP (AMD) in your BIOS settings. This is a 30-second task, but if you skip it, your expensive 3600MHz RAM runs at 2400MHz and you’re leaving performance on the table.
Storage: Speed vs Capacity Trade-offs
This is where budget builders have to make tough choices. Fast storage matters for system responsiveness, but modern games are huge.
Here’s my priority ranking for storage in a budget build:
- Boot drive must be NVMe SSD (not SATA, not HDD)
- 500GB minimum for boot drive
- Add secondary storage later as budget allows
- PCIe Gen3 NVMe is fine, Gen4 not worth premium
The Kingston NV2 I recommended is a DRAMless budget drive. This means it’s slower than premium drives in sustained writes, but for a gaming PC, you won’t notice. Game loading times are determined more by total bandwidth than by write endurance or DRAM cache.
A Samsung 990 Pro loads Windows in 8 seconds. The Kingston NV2 loads Windows in 10 seconds. For $40 vs $120, I’ll take the two extra seconds.
The real compromise is capacity. 500GB is tight. Here’s my recommended priority for game storage:
- Keep 2-3 multiplayer games you play regularly on the NVMe
- Add a $50 1TB SATA SSD for single-player game backlog
- Uninstall games you’ve finished (you can always re-download)
- Use cloud saves so reinstalling doesn’t lose progress
A lot of people stress about storage speed for game loading. Unless you’re playing Star Citizen or Microsoft Flight Simulator (which stream assets constantly), the difference between a Gen3 NVMe and Gen4 NVMe is like 2-3 seconds of loading time. Not worth $30 extra.
Power Supply: The Unsexy Essential
Nobody gets excited about power supplies, but this is where cheap components can literally burn down your house. I’m not exaggerating. Bad PSUs cause fires.
For a budget build with a Ryzen 5 5600 and Arc B570, you need 550W minimum. The system draws about 300W under full gaming load, so 550W gives you comfortable headroom.
Here’s what matters in a PSU:
- Brand reputation: EVGA, Corsair, Seasonic, be quiet! are safe bets
- 80+ rating: Bronze minimum, Gold is nice but not essential
- Warranty: 3+ years indicates the company stands behind it
- Proper protections: OVP, OCP, OTP (any reputable brand has these)
Efficiency rating (80+ Bronze vs Gold vs Platinum) affects your electricity bill by maybe $5-10 per year. It’s nice to have, but in a budget build, I’d rather have a quality 80+ Bronze unit than a sketchy 80+ Gold unit from a no-name brand.
The modular vs non-modular decision is purely about convenience. Modular PSUs let you detach unused cables for cleaner builds. Non-modular means you stuff extra cables behind the motherboard tray. It’s annoying but doesn’t affect performance.
In this price range, non-modular is standard. Deal with it. Your cable management won’t win beauty contests, but your PC will run fine.

Case: Airflow Beats Aesthetics
Your case needs to do three things: hold your components, keep them cool, and not be impossible to build in. Everything else is optional.
For budget cases, prioritize:
- Mesh front panel: Solid/glass fronts choke airflow
- Included fans: Buying fans separately adds $20-30
- Tool-free panels: Makes building easier
- Basic cable management: Cutouts and velcro straps
The Deepcool CC560 checks these boxes. It’s not pretty, but it moves air well and includes three fans. The interior is spacious enough that even a first-time builder won’t feel claustrophobic trying to route cables.
Cases with solid front panels or tempered glass fronts look nicer but run 5-10°C hotter. In a budget build where you’re using stock coolers and basic components, those extra degrees matter.
Fan placement matters too. The ideal setup is front intake (bringing cool air in) and rear exhaust (pushing hot air out). This creates positive pressure that also helps keep dust out. Most budget cases include this configuration out of the box.
Where Not to Cheap Out (I Learned This the Hard Way)
Building budget PCs for years taught me that some corners are safe to cut, while others will bite you. Here are the mistakes I’ve made so you don’t have to.
The Power Supply Fire
Three years ago, I helped a friend build a PC. He found a 600W power supply on Amazon for $28. Brand I’d never heard of, but hey, 600W is 600W, right?
Wrong.
Two months later, his PC shut off during a game and wouldn’t turn back on. We opened it up and the PSU had a burn mark near the cables. It fried his motherboard when it failed.
He spent $28 to save $30 off a decent EVGA unit. It cost him a $100 motherboard replacement and hours of troubleshooting. Stick with reputable PSU brands. This isn’t negotiable.
The Single-Stick RAM Mistake
My first budget build used 1x16GB RAM because it was $8 cheaper than 2x8GB. I didn’t understand dual-channel memory at the time.
My Cyberpunk frame rates were awful. I was getting 35 FPS when reviews showed the same GPU should get 55-60 FPS. I spent weeks thinking my GPU was defective.
Then someone on Reddit asked about my RAM configuration. I switched to 2x8GB and instantly gained 15 FPS. Never again.
The Too-Small SSD Problem
I once built with a 240GB SSD to save $20. Windows plus drivers took 40GB. I installed three games and it was full.
I spent the next year constantly uninstalling and reinstalling games. Modern Warfare alone is 150GB. Good luck managing that on 200GB of usable space.
500GB is the absolute minimum. I recommend 1TB if you can swing it, but 500GB is workable if you’re disciplined about what you install.
Safe Places to Save Money
- Case aesthetics (mesh is cheaper than glass)
- Stock CPU cooler vs aftermarket
- Non-modular power supply
- DDR4-3200 vs 3600 (small difference)
- Gen3 NVMe vs Gen4 (gaming doesn’t need Gen4)
- Micro-ATX vs full ATX motherboard
Never Cheap Out Here
- Power supply brand/quality
- Dual-channel vs single-channel RAM
- NVMe vs SATA SSD for boot drive
- Motherboard VRM quality
- GPU VRAM capacity
- CPU generation (old gen is fine, ancient is not)
The $1200-$1400 Build: Where Budget Meets Performance
If you can stretch your budget to around $1,300, you hit a sweet spot where component compromises mostly disappear. This is what I’d build if someone handed me $1,400 and said “make me something great.”

| Component | Part Selection | Price |
| CPU | AMD Ryzen 7 7800X3D | $400 |
| Motherboard | MSI B650 Tomahawk WiFi | $180 |
| RAM | 32GB DDR5-6000 (2x16GB) | $150 |
| GPU | AMD RX 7800 XT 16GB | $480 |
| Storage | 1TB Gen4 NVMe (WD Black SN850X) | $90 |
| Power Supply | Corsair RM750x 80+ Gold | $110 |
| Case | Lian Li Lancool 216 | $90 |
| CPU Cooler | Thermalright Peerless Assassin 120 | $35 |
| Total | $1,535 |
This build delivers excellent 1440p gaming and destroys 1080p. The Ryzen 7 7800X3D is the best gaming CPU you can buy in 2026, and the RX 7800 XT handles everything at high settings with 16GB of VRAM for future-proofing.
The DDR5 memory is expensive, but unavoidable on the AM5 platform. The good news is this platform will support future Ryzen CPUs for years, so your motherboard and RAM investment has a long upgrade runway.
Mid-Range Performance Build
This configuration delivers 1440p gaming at high settings with excellent frame rates and room to grow.
1440p Gaming: 80-120 FPS in AAA titles
1080p Competitive: 200+ FPS in esports
Future-Proof Platform
AM5 socket supports future Ryzen CPUs. This motherboard and RAM will serve you for 5+ years.
Upgrade Path: Drop in new CPU later
Modern Features: PCIe 5.0, DDR5, WiFi 6E
The 2026 RAM Crisis: What You Need to Know
I need to address the elephant in the room. RAM pricing in 2026 is absolutely brutal, and it’s affecting every budget build.
Here’s what happened. Starting in mid-2025, the three companies that actually manufacture memory chips (SK Hynix, Samsung, and Micron) decided to prioritize sales to large tech companies building AI data centers. Consumer retail got squeezed.
The result? DDR5 prices tripled. DDR4 prices more than doubled. A 32GB DDR5-6000 kit that cost $110 in March 2025 now costs $280-300.

For budget builders, this creates painful choices. Do you stick with 16GB and deal with limitations in memory-hungry games? Or do you blow an extra $150 on 32GB and sacrifice elsewhere?
My honest advice: if you’re building on AM4 with DDR4, get 16GB now and plan to add another 16GB later when prices (hopefully) normalize. If you’re going AM5 with DDR5, bite the bullet and get 32GB upfront, because the total system cost is already high anyway.
The good news is memory prices are cyclical. This won’t last forever. The supply constraints will ease eventually. But if you need a PC now, you’re stuck dealing with current reality.
The Actual Building Process (Without the Fluff)
Most build guides make this seem either terrifying or trivially easy. The truth is somewhere in between. If you can assemble IKEA furniture without crying, you can build a PC.
What You Actually Need
- Phillips head screwdriver (size #2)
- Good lighting (headlamp works great)
- Clean workspace (dining table is perfect)
- 2-3 hours without interruptions
- Your motherboard manual (seriously, read it)
- YouTube build guide playing in background (optional but helpful)
That’s it. You don’t need anti-static wristbands or magnetic screwdrivers or thermal paste applicators. The screwdriver and manual are enough.
Step 1: Install CPU and RAM on Motherboard
Do this before the motherboard goes in the case. It’s way easier.
For AMD CPUs, lift the retention arm, drop the CPU in the socket (it only fits one way), and lower the arm. There should be zero force required. If you’re forcing it, you’re doing it wrong.
For RAM, open the clips on both ends of the slot, line up the notch, and press firmly until both clips snap shut. You need more force than you’d think. Press straight down on both ends simultaneously.
Use slots 2 and 4 (counting from the CPU) for dual-channel mode. Your motherboard manual will confirm this.
Step 2: Install M.2 SSD
Most motherboards have a little metal heatsink over the M.2 slot. Remove the screw, remove the heatsink, insert your SSD at a 30-degree angle, push it down flat, and screw it in place.
If there’s plastic film on the heatsink’s thermal pad, remove it. I forgot this once and wondered why my SSD ran hot.
Step 3: Install I/O Shield and Mount Motherboard
The I/O shield is that metal rectangle with cutouts for your motherboard’s ports. It snaps into the back of your case from the inside. Press firmly on all four corners until it clicks.
Line up your motherboard with the standoffs in the case (those brass screws sticking up). Lower it carefully, making sure the ports align with the I/O shield. Start one screw in a corner, then the opposite corner, then fill in the rest. Don’t fully tighten until all screws are started.
Step 4: Connect Power and Front Panel
Plug in the 24-pin motherboard power connector (big one on the right edge). Plug in the 8-pin CPU power connector (top left corner). These require firm pressure to seat properly.
Front panel connectors (power button, reset, LEDs) are tiny and annoying. Your motherboard manual shows exactly where each goes. Take your time with these. I still mess them up occasionally after a decade of building.

Step 5: Install GPU
Remove the appropriate slot covers from your case (usually slots 2 and 3, or 3 and 4). Lower your GPU into the top PCIe slot (closest to CPU) and press firmly until the retention clip clicks. Screw the GPU bracket to the case.
Connect the PCIe power cables from your PSU. Make sure they click fully into place. A half-seated power connector is a common reason for “GPU not detected” issues.
What Usually Goes Wrong
In my experience helping people build their first PCs, these are the most common issues:
- RAM not fully seated: It needs more force than you think. Both clips must snap shut.
- Monitor plugged into motherboard instead of GPU: Use the GPU ports, not the motherboard ports.
- Forgot to flip PSU power switch: There’s a switch on the PSU itself. Flip it to the line (—) position.
- Front panel connectors backwards: These are marked + and -, make sure they match.
- CPU power not connected: Easy to miss the 8-pin connector in the top-left corner.
If your PC doesn’t boot on first try, don’t panic. Go through these five things first. That solves 90% of problems.
When Pre-Built Actually Makes Sense
I hate admitting this, but in 2026, sometimes buying a pre-built system makes more financial sense than DIY. The RAM pricing situation breaks the math.
System integrators buy components in bulk and have better access to memory supply than retail channels. Some pre-builts are currently cheaper than buying the parts individually, which is backwards from how it usually works.
Here’s when I’d recommend pre-built over DIY:
- You need a complete system NOW and can’t wait for sales
- The pre-built has equivalent specs at lower total cost
- You don’t want to deal with troubleshooting if something goes wrong
- You value warranty coverage on the complete system
- You’re not comfortable building yourself
What to watch for in pre-builts:
- Specific component models: Avoid listings that say “16GB DDR5” without specifying speed
- Power supply brand: Generic 600W PSUs are a red flag
- Motherboard quality: B-series chipsets are fine, but avoid proprietary boards
- Case airflow: Solid front panels choke performance
- Upgrade path: Standard ATX components or proprietary stuff?
Some decent pre-built brands to consider: NZXT, Skytech, ABS, CyberPowerPC (sometimes), iBuyPower (sometimes). Avoid: Most Amazon “gaming PCs” under $500, unknown brands with stock photos.
If you go pre-built, you’re sacrificing the learning experience and customization, but gaining time and sometimes cost savings. It’s a valid trade-off in this market.
Planning Your Upgrade Path
One advantage of building on a solid platform is future upgradability. Here’s how I think about upgrade priority in a budget system.
First Upgrade: More Storage
This is the easiest and cheapest upgrade. When your 500GB boot drive fills up, add a 1TB secondary drive. SATA SSDs are fine for game storage and cost around $70.
Installation takes five minutes. Plug in power and data cables, format in Windows, done. Instant relief from storage anxiety.
Second Upgrade: More RAM
If you started with 16GB, adding another 16GB makes a noticeable difference in system smoothness. Background apps don’t force you to close things while gaming. Alt-tabbing becomes snappier.
For this to work smoothly, buy the exact same RAM kit you started with. Mixing different RAM brands/speeds usually works, but matching kits eliminates compatibility issues.
Third Upgrade: Better GPU
This gives you the biggest performance jump. Your CPU and motherboard are fine for years, but GPUs advance quickly.
The Ryzen 5 5600 can handle up to an RTX 4070 class GPU without significant bottlenecking at 1440p. That’s a huge upgrade runway.
Before upgrading GPU, verify your power supply can handle it. The Arc B570 uses about 150W. An RTX 4070 uses about 200W. Your 550W PSU can handle that. An RTX 4080 at 320W? You’d need a new PSU.
This is why I recommend using a bottleneck calculator before any major upgrade. It tells you whether your other components will limit your new GPU’s performance.
Fourth Upgrade: Better CPU Cooler
The stock cooler works, but it’s loud under load. A $35 tower cooler like the Thermalright Peerless Assassin 120 cuts temperatures by 10-15°C and runs much quieter.
This is a quality-of-life upgrade more than performance. Your frame rates won’t change, but your ears will thank you.
When to Just Build New
Eventually, your platform becomes the limitation. For AM4 systems, that happens when games start requiring 8 P-cores or when PCIe 3.0 bandwidth limits newer GPUs.
In my experience, a well-built budget system lasts 4-6 years before a complete rebuild makes sense. You’ll upgrade GPU once or twice in that span, add storage and RAM as needed, but the core platform (CPU, motherboard, RAM) stays intact.
When you do rebuild, you can reuse your case, power supply (if quality), storage drives, and peripherals. So really you’re only replacing CPU, motherboard, RAM, and GPU. That’s more manageable cost-wise.

Optimization Tips That Actually Work
Building the PC is half the battle. Making it run optimally requires some software tweaking. Here’s what actually matters.
Enable XMP/DOCP for RAM
This is the #1 thing people forget. Your RAM runs at slow default speeds (2400MHz or so) unless you enable XMP in BIOS.
Restart your PC, press Delete or F2 during boot to enter BIOS. Find the XMP or DOCP setting (usually under AI Tweaker or similar). Enable it, save and exit.
This simple change can boost gaming performance by 10-20% in CPU-limited scenarios. It takes 30 seconds. Do it immediately.
Update GPU Drivers
Download the latest drivers directly from AMD or Intel’s website. Don’t use the disc that came with your GPU – those drivers are months old.
For Intel Arc, driver updates have been huge. The GPU I tested six months ago is legitimately 15% faster today after driver updates. Keep your drivers current.
Adjust Windows Power Plan
Go to Control Panel > Power Options > Change plan settings > Change advanced power settings. Set to High Performance mode.
This prevents Windows from throttling your CPU to save power during gaming. The power difference is minimal (maybe $2/month on electricity) but the performance improvement is real.
Disable Unnecessary Startup Programs
Press Ctrl+Shift+Esc to open Task Manager. Go to Startup tab. Disable anything you don’t need launching at boot.
Common culprits: Discord (can launch manually), Spotify, random update checkers. Your system boots faster and has more RAM available for games.
In-Game Settings That Matter
For competitive games, prioritize frame rate over visual quality. Lower these settings first:
- Shadows: Medium instead of Ultra saves 10-15 FPS
- Anti-aliasing: 2x or 4x is fine, 8x is overkill
- View distance: High is usually enough
- Effects quality: Low in competitive games (clearer visibility)
For single-player games, find settings that hit your target frame rate (60 FPS for most people). Use a frame rate cap to prevent your GPU from working harder than necessary.
Frame Rate Caps: If you have a 144Hz monitor, cap your frame rate at 144 FPS. Running at 200 FPS creates extra heat and fan noise without any visual benefit. Your monitor can’t display more than its refresh rate anyway.
Mistakes I See All the Time (And How to Avoid Them)
After helping dozens of people build PCs, I’ve seen the same mistakes repeatedly. Learn from others’ pain.
Buying Random Components Without a Complete Plan
Don’t buy a GPU on sale, then figure out the rest later. Plan your entire build at once to ensure compatibility and balance.
I’ve seen people buy an expensive GPU, then realize they can’t afford a CPU that won’t bottleneck it. Now they’re stuck waiting months to complete the build, and prices change.
Make a complete parts list. Check compatibility on PC Part Picker. Verify everything works together before you buy anything.
Skipping the Motherboard Manual
Your motherboard manual tells you exactly which RAM slots to use, where every cable connects, and how to enable XMP. Read it. At least skim the diagrams.
I’ve troubleshot “broken” PCs where the only problem was front panel connectors plugged in backwards because someone didn’t check the manual.
Mixing Different RAM Speeds
If you have 2x8GB DDR4-3600 and add 2x8GB DDR4-3200 later, your system runs all RAM at the slower speed (3200MHz). You’re leaving performance on the table.
Either buy matching kits, or plan to replace your RAM entirely when upgrading capacity.
Mounting Fans Backwards
Fans have an airflow direction. The side with the mounting frame pushes air out. The side with the label usually pulls air in.
Front fans should pull air into the case. Rear/top fans should push air out. Getting this backwards creates negative pressure and hurts cooling.
Forgetting to Remove Plastic Protective Films
GPU shrouds, tempered glass panels, and CPU cooler bases often have plastic film on them. Remove all plastic before installation.
I once watched someone complain about terrible CPU temps for an hour before we discovered they left the plastic on the cooler’s base. The cooler wasn’t making proper contact with the CPU.
Not Testing Before Cable Management
Build everything, connect all cables (even if messy), and test boot before spending an hour on cable management.
If something doesn’t work, you’ll need to disconnect everything to troubleshoot anyway. Test first, make it pretty later.

Troubleshooting: When Things Don’t Work
Not every build works perfectly on first boot. Here’s how to diagnose common problems.
No Power At All
If nothing happens when you press the power button:
- Check if the PSU power switch is on (back of the unit)
- Verify the power cable is fully seated in PSU and wall outlet
- Test the outlet with something else to confirm it works
- Check if the 24-pin motherboard power is fully connected
- Try shorting the power switch pins with a screwdriver (bypasses possibly faulty case switch)
Fans Spin But No Display
This is the most common first-boot problem. Here’s the checklist:
- Verify monitor cable is plugged into GPU, not motherboard
- Check if GPU power cables are fully connected and clicked in place
- Reseat the GPU (remove and reinstall)
- Reseat RAM (remove and reinstall in correct slots)
- Try one stick of RAM at a time in slot 2
- Check if CPU power (8-pin) is connected
Most “no display” issues are RAM not fully seated or monitor plugged into wrong port.
System Crashes During Gaming
If your PC crashes or restarts under load:
- Overheating: Check temps with HWMonitor. CPU over 90°C or GPU over 85°C is concerning
- Insufficient power: GPU not getting enough power from PSU or loose cables
- RAM instability: Try disabling XMP and running at default speeds
- Driver issue: Update or roll back GPU drivers
Low FPS or Stuttering
If performance is worse than expected:
- Verify RAM is in dual-channel mode (slots 2 and 4)
- Check if XMP is enabled (RAM running at full speed)
- Confirm monitor is plugged into GPU, not motherboard
- Update GPU drivers
- Check temps – thermal throttling kills performance
- Close background apps eating RAM or CPU
I’d also recommend using a bottleneck calculator to verify your components are balanced. Sometimes low FPS is just one component limiting everything else.
Diagnose Performance Issues
Getting lower frame rates than expected? Check if your components are working efficiently together or if one part is holding back your system.
Final Thoughts on Budget Building in 2026
Building a budget PC in 2026 isn’t as straightforward as it was a couple of years ago. RAM and SSD prices made everything harder. The math that used to favor DIY builds over pre-builts is closer than I’d like.
But it’s still doable. And it’s still worth it.
The system I outlined for $640 will run games well. It won’t max out everything at 4K, but that’s not what budget builds are for. You get smooth 1080p performance, fast system responsiveness, and a platform you can upgrade over time.
More importantly, you learn how your PC works. When something goes wrong three years from now, you’ll know how to fix it. When you want to upgrade, you’ll understand what matters. That knowledge has value beyond any parts list.
My biggest piece of advice: don’t wait for the “perfect” time to build. There’s always a new GPU launching in six months, or RAM prices might drop next quarter, or some new technology is coming. You’ll never build if you’re always waiting.
Build now with the best options available now. Enjoy it. Upgrade later when you have budget and reason. That’s how it works.

If you found this guide helpful, or if you’re planning a build, I’d genuinely love to hear about it. What’s been your biggest challenge with PC part prices lately? Are you going DIY or considering pre-built given the current market? Drop a comment and let me know.
And if you’re about to start buying parts, do yourself a favor and test your component balance first. Two minutes with a bottleneck calculator can save you from buying mismatched parts that waste money and performance.
Good luck with your build. You’ve got this.
Questions People Keep Asking Me
Is 16GB of RAM really enough in 2026?
It’s tight but workable. Most games run fine on 16GB if you close background apps before gaming. Some newer titles like Star Wars Jedi Survivor and Hogwarts Legacy recommend 32GB, but they’re still playable on 16GB with occasional texture streaming. I recommend starting with 16GB to hit budget targets, then adding another 16GB later when RAM prices hopefully come down.
Should I wait for prices to improve?
Memory prices will eventually stabilize, but no one knows when. Could be three months, could be a year. If you need a PC now, build now. If you can wait and use your current system comfortably, waiting might save you 0-150 on RAM. But you’re also not gaming on your new system during that wait, which has its own cost in fun missed.
Can I use my old hard drive from my previous PC?
Physically, yes – you can install any SATA drive in your new build. But I wouldn’t use it as your boot drive. Install Windows fresh on your new NVMe SSD for best performance. You can add your old drive as secondary storage for games and files, which actually works great and saves money.
Why don’t you recommend Intel Arc for everyone?
Intel’s Arc B570 offers incredible value, but driver maturity is still slightly behind AMD and NVIDIA. Most games work great, but occasionally you’ll hit a title with optimization issues. If you’re okay dealing with occasional driver updates and minor bugs, Arc is fantastic. If you want absolute stability and “it just works” reliability, RX 7600 or RTX 4060 are safer bets.
Do I need a CPU cooler upgrade or is stock fine?
For the Ryzen 5 5600, stock cooling is adequate for normal use. The CPU doesn’t run particularly hot and the Wraith Stealth handles it fine. The downside is noise – it gets pretty loud under load. If you wear headphones while gaming, you won’t care. If you want a quieter system, a -35 tower cooler is a nice quality-of-life upgrade but not required.
What about WiFi and Bluetooth?
The MSI B550M PRO-VDH WiFi includes built-in WiFi and Bluetooth, which is why I recommend it despite costing -30 more than boards without wireless. If you go with a cheaper board without WiFi, you’ll need to buy a PCIe WiFi adapter (-40) or USB WiFi dongle (-25). The integrated option is cleaner and doesn’t use up an expansion slot.
Can I upgrade to a better CPU later on the same motherboard?
On AM4, you can upgrade from Ryzen 5 5600 up to Ryzen 7 5800X3D or Ryzen 9 5950X. That’s a solid upgrade path. However, AM4 is end-of-life – AMD won’t release new CPUs for it. If you build on AM5 instead, you’ll have upgrade options for several more years as AMD releases new Ryzen generations on the same socket.
How much does electricity cost to run this PC?
This build pulls about 300W under full gaming load. At average US electricity rates (
Questions People Keep Asking Me
Is 16GB of RAM really enough in 2026?
It’s tight but workable. Most games run fine on 16GB if you close background apps before gaming. Some newer titles like Star Wars Jedi Survivor and Hogwarts Legacy recommend 32GB, but they’re still playable on 16GB with occasional texture streaming. I recommend starting with 16GB to hit budget targets, then adding another 16GB later when RAM prices hopefully come down.
Should I wait for prices to improve?
Memory prices will eventually stabilize, but no one knows when. Could be three months, could be a year. If you need a PC now, build now. If you can wait and use your current system comfortably, waiting might save you $100-150 on RAM. But you’re also not gaming on your new system during that wait, which has its own cost in fun missed.
Can I use my old hard drive from my previous PC?
Physically, yes – you can install any SATA drive in your new build. But I wouldn’t use it as your boot drive. Install Windows fresh on your new NVMe SSD for best performance. You can add your old drive as secondary storage for games and files, which actually works great and saves money.
Why don’t you recommend Intel Arc for everyone?
Intel’s Arc B570 offers incredible value, but driver maturity is still slightly behind AMD and NVIDIA. Most games work great, but occasionally you’ll hit a title with optimization issues. If you’re okay dealing with occasional driver updates and minor bugs, Arc is fantastic. If you want absolute stability and “it just works” reliability, RX 7600 or RTX 4060 are safer bets.
Do I need a CPU cooler upgrade or is stock fine?
For the Ryzen 5 5600, stock cooling is adequate for normal use. The CPU doesn’t run particularly hot and the Wraith Stealth handles it fine. The downside is noise – it gets pretty loud under load. If you wear headphones while gaming, you won’t care. If you want a quieter system, a $25-35 tower cooler is a nice quality-of-life upgrade but not required.
What about WiFi and Bluetooth?
The MSI B550M PRO-VDH WiFi includes built-in WiFi and Bluetooth, which is why I recommend it despite costing $20-30 more than boards without wireless. If you go with a cheaper board without WiFi, you’ll need to buy a PCIe WiFi adapter ($25-40) or USB WiFi dongle ($15-25). The integrated option is cleaner and doesn’t use up an expansion slot.
Can I upgrade to a better CPU later on the same motherboard?
On AM4, you can upgrade from Ryzen 5 5600 up to Ryzen 7 5800X3D or Ryzen 9 5950X. That’s a solid upgrade path. However, AM4 is end-of-life – AMD won’t release new CPUs for it. If you build on AM5 instead, you’ll have upgrade options for several more years as AMD releases new Ryzen generations on the same socket.
How much does electricity cost to run this PC?
This build pulls about 300W under full gaming load. At average US electricity rates ($0.15/kWh), gaming 4 hours a day costs about $5-6 per month. Idle power is around 50-70W, which is negligible. Your gaming PC costs less per month than leaving a lightbulb on 24/7. The initial hardware cost matters way more than electricity.
What if I want to stream on Twitch or YouTube?
The Ryzen 5 5600 can handle basic 1080p streaming at 30 FPS to Twitch while gaming, but you’ll take a performance hit. The Arc B570’s encoding isn’t as good as NVIDIA’s NVENC encoder. If streaming is a priority, consider stretching budget for an RTX 4060 or better CPU with more cores. Streaming is CPU and GPU intensive – budget builds struggle with both simultaneously.
How do I know if my components will work together before I buy?
Use PC Part Picker to check basic compatibility (socket types, physical dimensions, power requirements). Then use a bottleneck calculator to check performance balance between CPU and GPU. This takes 5 minutes total and prevents expensive mistakes like pairing a high-end GPU with a CPU that can’t feed it properly.
.15/kWh), gaming 4 hours a day costs about -6 per month. Idle power is around 50-70W, which is negligible. Your gaming PC costs less per month than leaving a lightbulb on 24/7. The initial hardware cost matters way more than electricity.
What if I want to stream on Twitch or YouTube?
The Ryzen 5 5600 can handle basic 1080p streaming at 30 FPS to Twitch while gaming, but you’ll take a performance hit. The Arc B570’s encoding isn’t as good as NVIDIA’s NVENC encoder. If streaming is a priority, consider stretching budget for an RTX 4060 or better CPU with more cores. Streaming is CPU and GPU intensive – budget builds struggle with both simultaneously.
How do I know if my components will work together before I buy?
Use PC Part Picker to check basic compatibility (socket types, physical dimensions, power requirements). Then use a bottleneck calculator to check performance balance between CPU and GPU. This takes 5 minutes total and prevents expensive mistakes like pairing a high-end GPU with a CPU that can’t feed it properly.