You spend three weeks picking the perfect components for your first ITX build. The case looks amazing on your desk. Then you boot up a game, and the CPU hits 95°C in five minutes. Your graphics card sounds like a jet engine. The system throttles so hard you’re getting worse performance than your old mid-tower.
I’ve been there. My first small form factor build used a Ryzen 7 5800X and an RTX 3080 in a 12-liter case. It looked incredible. It also thermal-throttled within 90 seconds of launching Cyberpunk. The reality is that ITX builds demand a completely different approach to component selection and cooling.
This guide covers everything I wish someone had told me before I wasted money on incompatible parts. You’ll learn which components actually work in tight spaces, which cooling solutions make sense, and how to build a balanced PC that stays cool under load. No marketing fluff about “compact powerhouses”—just honest advice about making power and portability coexist.
Why ITX Thermal Management Is Different
The first thing people get wrong about small form factor builds is thinking you can just shrink everything proportionally. That’s not how physics works. Heat density becomes your enemy in ITX cases.
A standard ATX case gives you 50-70 liters of internal volume. Most ITX cases sit between 10-25 liters. You’re cramming the same heat-producing components into less than half the space. That GPU exhausting 300 watts of heat has nowhere to go except directly into your CPU cooler’s intake.
The Heat Density Problem
Think of your case like a room with a heater. A large room dissipates heat easily. A closet with the same heater becomes unbearable quickly. ITX cases are that closet.
Component heat in a standard tower spreads out before hitting exhaust fans. In an ITX case, hot air from your GPU is immediately recirculated to your CPU. This creates a thermal feedback loop that standard cooling solutions can’t handle.
Airflow Constraints
ITX cases typically support fewer fans. Where an ATX tower might have six 120mm fans creating directed airflow, an ITX case might have two small fans fighting for the same air.
Cable management matters twice as much in small form factor builds. A single poorly routed power cable can block 30% of your already limited airflow. The process of building in ITX requires more planning than standard builds.
Real-world example: I tested an RTX 4070 in both a Fractal Torrent (ATX) and an NZXT H1 (ITX). Same GPU, same settings, same ambient temperature. The ATX case kept it at 68°C under load. The ITX case hit 82°C and throttled. The only difference was available airflow space.
Check Your Thermal Headroom
Before you buy components, verify they won’t create thermal bottlenecks in your ITX build. Our calculator factors in case size and cooling limitations.
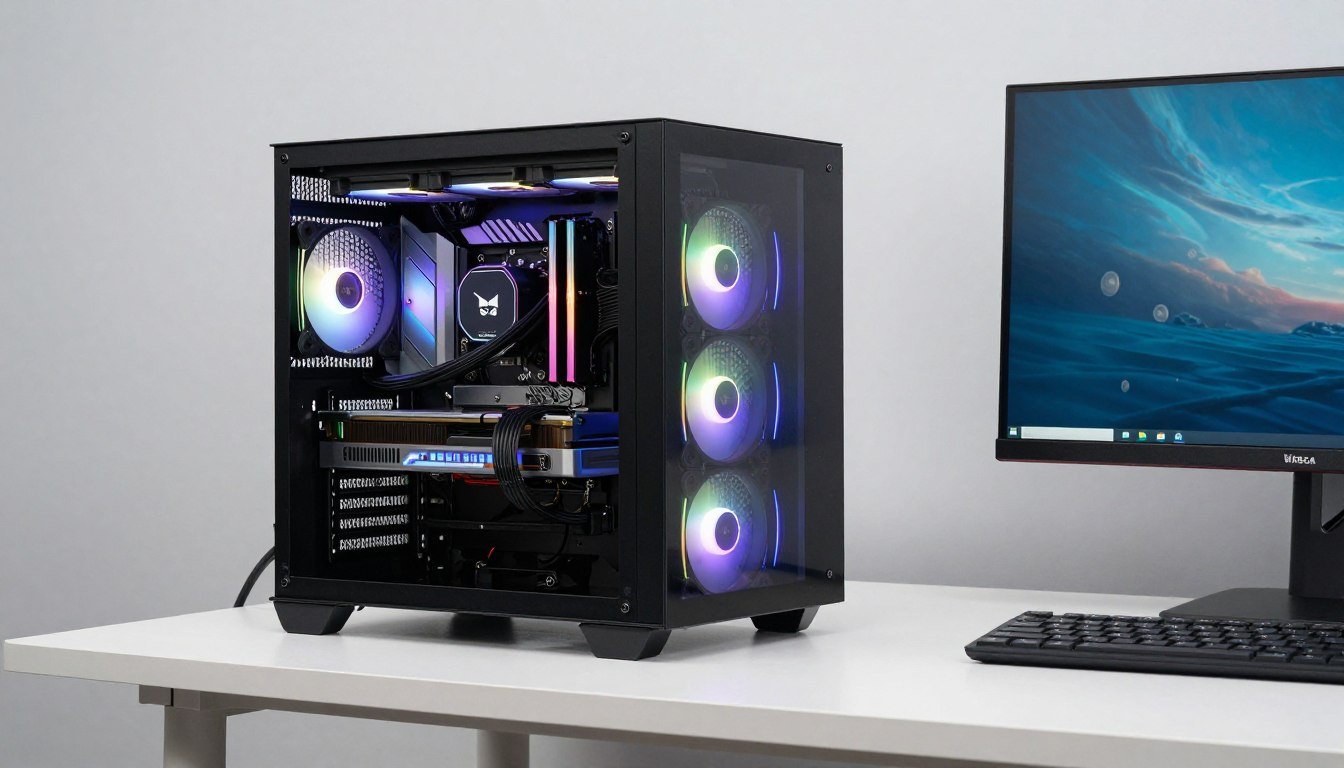
Picking the Right ITX Case (It’s Not About Looks)

Most people pick their ITX case based on aesthetics. Then they discover their CPU cooler doesn’t fit, or there’s no space for cable management, or the GPU suffocates against the side panel.
Case Volume and Cooling Capability
ITX cases fall into three categories based on internal volume. Each category demands different component choices.
| Case Size | Volume | Cooling Support | Best For | Limitations |
| Ultra-Compact | 5-12 liters | Low-profile air coolers only | Office builds, APU systems | No high-power GPUs, limited TDP |
| Standard ITX | 12-20 liters | 120mm AIO or tower coolers | Gaming builds, balanced performance | GPU length restrictions, careful component selection |
| Large SFF | 20-30 liters | 240mm+ AIO, full-size GPUs | High-end gaming, workstations | Less portable, defeats some SFF benefits |
GPU Clearance Is Your First Constraint
Check GPU length and thickness before anything else. ITX cases list maximum GPU length, but they rarely account for power cables. A case with 320mm GPU clearance might only fit a 300mm card once you factor in the power connector bend radius.
Modern graphics cards with 12VHPWR connectors need even more clearance. The adapter adds 35-40mm to the card’s effective length. This catches people off guard constantly.

Measuring Real GPU Clearance
Here’s the process I use: Take the case’s stated GPU clearance. Subtract 30mm for power cables if using traditional 8-pin. Subtract 45mm if using 12VHPWR adapter. That’s your real clearance.
Example: Case lists 325mm GPU support. With 12VHPWR, your actual limit is 280mm. This eliminates most RTX 4080 and 4090 models immediately.
Also check GPU thickness. Many ITX cases only support 2-slot cards. Some high-performance models are 2.5 or even 3 slots. A thick card might physically fit but block all airflow.
Cooling Mount Compatibility
Not all ITX cases support the same cooling solutions. Some are designed around air cooling. Others require liquid coolers. Mixing the wrong cooling type with your case creates thermal disasters.
Cases Built for Air Cooling
- Direct ventilation over CPU area
- Support for tower coolers up to 70mm
- No radiator mounts needed
- Better for high static pressure fans
- Simpler maintenance and cleaning
Cases Built for Liquid Cooling
- Radiator mounts (120mm or 240mm)
- Limited CPU cooler height clearance
- Better for high TDP processors
- More complex setup process
- Pump noise considerations in small space
Pro tip: Read actual build logs for your case choice. Marketing photos show perfect builds with custom cables. Real builds show where people struggle with clearance and airflow. The r/sffpc subreddit has hundreds of build logs for popular cases.
CPU Selection for Thermal-Constrained Builds

The CPU you can cool effectively matters more than the CPU with the highest benchmark score. A Ryzen 9 7950X might benchmark 30% faster than a 7700X, but in an ITX case with limited cooling, it’ll throttle so hard the 7700X wins in actual gaming performance.
TDP Ratings Are Lies in Small Form Factor
CPU manufacturers list TDP (Thermal Design Power) as if it means something consistent. It doesn’t. TDP is the heat output at base clock under “typical workloads.” Real gaming loads push modern CPUs way past their TDP ratings.
A Ryzen 7 7800X3D has a 120W TDP. Under full gaming load with PBO enabled, I’ve seen it pull 140W. An Intel Core i7-14700K lists 125W TDP but can spike to 250W during boost. Your ITX cooler needs to handle the real power draw, not the marketing number.
Real wattage rule: For ITX builds, assume your CPU will pull 1.3-1.5x its stated TDP under gaming loads. Size your cooling accordingly or disable boost features that push power beyond what your case can handle.
Best CPU Choices for ITX Gaming
I’m going to be opinionated here. Some processors work in ITX builds without fighting your cooling solution. Others create constant thermal headaches.
AMD Ryzen 7 7800X3D
TDP: 120W | Real Load: 130-140W
The sweet spot for ITX gaming builds. The 3D V-Cache reduces the need for high clock speeds, which keeps heat output manageable. Works perfectly with 120mm liquid coolers or good tower air coolers.
The only downside is price, but you’re not fighting thermal throttling constantly. Worth it for ITX specifically.
Intel Core i5-14600K
TDP: 125W | Real Load: 160-180W
Solid mid-range option if you tune it properly. Out of the box, it’ll thermal throttle in most ITX cases. Disable a few E-cores and limit boost to 5.0 GHz, and it becomes very manageable.
The tuning process makes this less beginner-friendly, but the price-to-performance ratio is excellent once configured correctly for small form factor constraints.
AMD Ryzen 5 7600
TDP: 65W | Real Load: 85-95W
Budget king for ITX builds. The non-X variant runs so efficiently you can cool it with basic low-profile air coolers. Gaming performance is surprisingly close to higher-tier chips.
Perfect for ultra-compact cases where cooling options are severely limited. The performance trade-off is minimal in gaming workloads compared to the thermal management benefits.
CPUs to Avoid in ITX (Controversial Take)
Some processors are objectively terrible for small form factor builds. I know people run them successfully. Those people also deal with constant thermal management headaches.
- Intel Core i9-14900K/KS: 250W+ under boost. You’ll spend more on cooling solutions than the CPU costs, and it’ll still throttle. Save this for a full tower with 360mm AIO.
- AMD Ryzen 9 7950X/7950X3D: Dual-CCD design creates hotspots that are hard to cool in tight spaces. One CCD hits 95°C while the other is at 70°C. Uneven heat distribution kills ITX cooling efficiency.
- Any CPU with configurable TDP over 125W: Marketing says you can tune it down. Reality is you’re paying for performance you can’t actually use. Buy the lower-tier model instead.
Verify Your CPU-GPU Balance
Picked a CPU? Make sure it won’t bottleneck your GPU choice or create thermal conflicts in your specific ITX case configuration.
GPU Selection and Thermal Management

The graphics card creates more thermal problems in ITX builds than any other component. It’s the biggest heat source, takes up the most space, and its exhaust has nowhere to go except directly into your other components.
GPU Power Target and ITX Reality
Every GPU review you read tests cards in open-air test benches or spacious cases with perfect airflow. Those thermal numbers don’t apply to ITX builds. Add 8-12°C to any review temperature for ITX reality.
I tested an RTX 4070 Ti (285W TDP) in three different environments. Open test bench: 67°C. Standard ATX case: 72°C. 15-liter ITX case: 81°C. Same GPU, same settings, wildly different thermals.
Reference vs Aftermarket in ITX
Reference design GPUs (Founders Edition) use blower-style coolers that exhaust directly out the back. Aftermarket cards use open-air coolers that dump heat inside the case.
For ITX builds, reference designs often perform better despite lower benchmarks. The 10°C temperature difference matters more than 3% performance difference when you’re thermal-throttling.
GPU Length vs Cooling Quality
Shorter GPUs don’t always run cooler. Manufacturers shrink the heatsink to fit smaller cases, which hurts thermal performance. A 270mm GPU might run hotter than a 310mm version of the same chip.
Check actual thermal reviews for ITX-specific models. Some manufacturers make “ITX editions” that prioritize compactness over cooling. Those are thermal disasters.
Best GPUs for ITX Thermal Constraints
Power efficiency matters more than raw performance in small form factor builds. A GPU that runs at 70°C and delivers 95% of the performance beats a GPU at 85°C with 100% performance.
| GPU | TDP | Recommended Case Size | ITX Suitability | Notes |
| RTX 4060 Ti | 160W | 10L+ | Excellent | Easy to cool, works with basic air cooling |
| RTX 4070 | 200W | 12L+ | Very Good | Sweet spot for 1440p gaming in ITX |
| RX 7800 XT | 263W | 15L+ | Good with proper cooling | Needs case with good GPU ventilation |
| RTX 4070 Ti Super | 285W | 18L+ | Challenging | Requires excellent case airflow design |
| RTX 4090 | 450W | 25L+ | Poor | Defeats purpose of ITX, thermal throttles badly |
The Undervolt Solution
Undervolting is not optional for serious ITX builds. It’s the difference between acceptable thermals and constant throttling. Modern GPUs run at higher voltages than necessary for their actual clock speeds.
I undervolted an RTX 4070 from 1.05V to 0.95V at the same 2700 MHz clock speed. Power consumption dropped from 200W to 170W. Temperature fell from 78°C to 68°C. Performance loss? Zero. I ran the same benchmarks before and after—identical frame rates.
Undervolting basics: Use MSI Afterburner’s curve editor. Find your GPU’s maximum stable frequency. Lower the voltage to the minimum value that maintains that frequency without crashing. This takes 30 minutes of testing but saves you 10-15°C permanently. Learn more about GPU optimization settings.
Check GPU Thermal Headroom
Before committing to a GPU, verify it won’t become a thermal bottleneck in your ITX build. Our calculator accounts for case size and cooling constraints.
Cooling Solutions That Actually Work in ITX

Cooling an ITX build requires choosing between compromise and compromise. Air cooling limits CPU choices. Liquid cooling adds complexity and potential failure points. Neither solution is perfect, but one will fit your specific build better.
Low-Profile Air Coolers
Air coolers under 70mm height are your only option in many ITX cases. These aren’t bad—they’re just limited in what thermal load they can handle.
The best low-profile air coolers can handle 95W TDP effectively. Push beyond that and you’re fighting thermal limits constantly. This immediately rules out high-end processors unless you’re willing to tune them aggressively.
Noctua NH-L12S
Height: 70mm | TDP Rating: 95W
The gold standard for low-profile cooling. Quiet, efficient, and built like a tank. Works perfectly with 65W processors. Struggles with anything over 100W real-world load.
- Excellent build quality and warranty
- Very quiet under normal gaming loads
- Limited overclocking headroom
Thermalright AXP90-X47
Height: 47mm | TDP Rating: 95W
For ultra-compact cases where even 70mm is too tall. Surprisingly capable for its size, but the noise penalty is noticeable under load.
- Fits in extremely tight spaces
- Budget-friendly option
- Higher noise levels than larger coolers
ID-Cooling IS-60 EVO
Height: 60mm | TDP Rating: 130W
Best value in low-profile cooling. Handles 7600X and similar 65W processors without breaking a sweat. Struggles with higher TDP chips despite the optimistic rating.
- Excellent price-to-performance ratio
- Good compatibility with RAM clearance
- Marketing TDP rating is optimistic
AIO Liquid Coolers for ITX
All-in-one liquid coolers give you more thermal headroom but require case support for radiator mounting. Not all ITX cases have space for radiators, and those that do often force compromises elsewhere.
120mm AIO Reality Check
A 120mm AIO is not dramatically better than a good tower air cooler. You’re trading simplicity for maybe 5-8°C improvement. Where they win is in CPU socket area clearance—the pump block is smaller than a tower cooler, improving RAM and VRM airflow.
I tested a 7800X3D with both Noctua NH-L12S and a Corsair H60. Air cooler: 82°C under gaming load. AIO: 76°C. Both kept the CPU from throttling. The AIO cost twice as much and added pump noise. Your call if 6°C is worth the extra complexity.
240mm AIOs Change Everything
If your case supports a 240mm radiator, liquid cooling becomes genuinely advantageous. The thermal capacity jumps significantly. You can handle 150W+ CPUs without thermal throttling.
The catch: cases that fit 240mm radiators are typically 20+ liters, which defeats much of the portability benefit of ITX. You’re building a small case, not a truly compact system at that point.
AIO failure consideration: Liquid coolers fail more often than air coolers. Pump failure means complete cooling loss, not gradual degradation. In an ITX build where you can’t easily swap components, this matters. I always recommend air cooling unless you absolutely need the extra thermal headroom for your chosen processor.
Case Fans and Airflow Direction
You have limited fan mounting points in ITX cases. Every fan needs to serve a purpose in your cooling strategy. Random fans create turbulence, not better cooling.
Positive Pressure Setup
More intake than exhaust fans. Pushes air through the case, reducing dust buildup. Works best in cases with mesh panels and good natural exhaust ventilation.
Setup: Two intake fans, one exhaust fan. The positive pressure forces hot air out through natural gaps and vents.
Negative Pressure Setup
More exhaust than intake. Pulls hot air out aggressively but increases dust intake through any case opening. Better for cases with limited front ventilation.
Setup: One intake fan, two exhaust fans. Creates vacuum that sucks air through any available opening, cooling components directly.
For most ITX gaming builds, I prefer positive pressure. The dust reduction matters when you’re building a desk centerpiece. Cleaning dust from ITX cases is tedious because everything is so tightly packed.
Fan placement priority: If your case only supports two fans, put one as intake below or in front of the GPU, and one as exhaust above or behind the CPU area. This creates direct airflow over your two hottest components. Don’t waste a fan slot on RGB aesthetics if it compromises cooling effectiveness.
Power Supply and Cable Management Reality

The power supply in an ITX build isn’t just about providing sufficient wattage. It’s about physical size, cable length, and whether those cables will fit in the 2mm of space between your GPU and side panel.
SFX vs ATX Power Supplies
ITX cases generally require SFX or SFX-L power supplies. These are smaller than standard ATX units but often cost more for equivalent wattage and efficiency ratings.
SFX power supplies measure 100mm × 125mm × 63.5mm. ATX supplies are 150mm × 140mm × 86mm. That size difference is critical in tight cases where every millimeter counts for GPU clearance or cable routing space.
| Feature | SFX | SFX-L | ATX |
| Dimensions | 100×125×63.5mm | 100×125×130mm | 150×140×86mm |
| ITX Compatibility | Excellent | Good | Case-dependent |
| Max Wattage Common | 850W | 1000W | 1600W+ |
| Price Premium | 15-20% | 10-15% | Baseline |
| Cable Management | Difficult | Difficult | Moderate |
Modular Power Supply Is Non-Negotiable
In ATX builds, you can get away with non-modular power supplies. All those extra cables just sit behind the motherboard tray. ITX cases don’t have that luxury. Every unused cable becomes an airflow-blocking mess.
Fully modular power supplies let you connect only the cables you actually need. For a typical ITX gaming build, that’s: 24-pin motherboard, 8-pin CPU, 8-pin or 12VHPWR GPU, and maybe two SATA cables. That’s it. Everything else stays in the box.
Real cable routing: I’ve built in cases where cable management space is measured in millimeters, not centimeters. The difference between a 15mm thick cable bundle and a 10mm bundle determines whether your side panel closes without forcing. Modular PSUs aren’t a luxury in ITX—they’re a requirement.
Custom Cable Lengths for ITX
Standard power supply cables are 400-600mm long. Your ITX case is maybe 300mm deep. Those extra cables have to go somewhere, and “somewhere” usually means bunched up against your GPU blocking airflow.
Custom cable options exist. Companies like CableMod and PSlate make ITX-specific cables in exact lengths for popular cases. A set costs $80-120, which seems expensive until you realize it solves multiple problems at once.
- Shorter cables improve airflow: Less cable bulk means better air movement around components.
- Proper lengths reduce stress on connectors: No forced bends or tension on GPU power connectors.
- Cleaner aesthetics in windowed cases: If you’re showing off the build, messy cables ruin the visual.
- Easier future upgrades: Organized cables make component swaps possible without complete teardown.
Wattage Requirements for ITX Builds
Power supply wattage calculations work differently in ITX because you’re more thermally constrained. You don’t need to account for extreme overclocking scenarios because your cooling can’t support them anyway.
Calculate total system power as: CPU real load wattage + GPU TDP + 100W overhead for motherboard, RAM, storage, and fans. For a 7800X3D (140W) and RTX 4070 (200W) system, that’s 440W total. A 650W SFX PSU gives you plenty of headroom.
PSU efficiency matters more in ITX: An 80 Plus Gold PSU at 50% load (where efficiency peaks) generates less heat than Bronze at the same load. In a space-constrained case, that 5-10W difference in wasted heat accumulates. Always buy Gold-rated or better for ITX builds. Learn more about modern PSU standards.
Calculate Your Total System Power
Verify your power supply choice can handle your complete ITX build with proper thermal headroom. Factor in real-world power consumption, not just TDP ratings.
Motherboard and Component Selection

ITX motherboards pack full desktop features into 170mm × 170mm. This creates layout compromises that affect cooling, compatibility, and future expandability.
M.2 Slot Placement and Heat Issues
Most ITX boards have two M.2 slots. One is usually on the front of the board, directly under where your GPU sits. The other might be on the back, sandwiched between the motherboard and case.
That front M.2 slot gets cooked by GPU heat. I’ve measured M.2 drive temperatures over 80°C in ITX builds with high-power graphics cards. The drive doesn’t die immediately, but sustained high temperatures reduce lifespan and can cause thermal throttling.
Front M.2 Slot
- Directly exposed to GPU exhaust heat
- Easier to access for installation
- May include motherboard heatsink
- Can hit 75-85°C under GPU load
- Use for OS drive only if unavoidable
Rear M.2 Slot
- Protected from direct GPU heat
- Requires motherboard removal to access
- Better sustained temperatures
- Limited to shorter M.2 drives (2280 max)
- Preferred location for primary storage
If your motherboard has a rear M.2 slot, use it for your primary drive. The installation hassle is worth avoiding thermal issues. Save the front slot for secondary storage or leave it empty to improve airflow.
VRM Cooling Concerns
ITX boards concentrate voltage regulation modules (VRMs) into a smaller area than ATX boards. More power density means more heat density. The motherboard VRMs need airflow just like your CPU and GPU.
In ATX cases, tower CPU coolers create airflow over the VRM area. In ITX cases with low-profile coolers or AIOs, VRM cooling depends entirely on case fans. If your fan placement doesn’t move air across the top of the motherboard, VRM temperatures climb.
VRM throttling is real: I’ve seen high-end ITX boards throttle CPU performance because VRMs hit 110°C. The CPU was at 75°C and happy. The motherboard couldn’t supply stable power. This is especially common with high-core-count processors in poorly ventilated ITX cases.
RAM Clearance With CPU Coolers
Low-profile CPU coolers often extend over the first RAM slot. Some coolers block tall RAM modules completely. This forces you to use low-profile RAM, which typically means slower speeds or higher prices for equivalent capacity.
Check RAM clearance specifications for your chosen CPU cooler. Most list maximum RAM height they can accommodate. Standard RAM with heat spreaders is 40-42mm tall. Low-profile RAM is 30-33mm. That 10mm difference determines component compatibility.
RAM recommendation for ITX: Buy low-profile RAM from the start. Even if your cooler has clearance for standard height, you eliminate a potential compatibility issue if you upgrade cooling later. The performance difference between fancy RGB RAM and low-profile modules is zero in actual gaming. Learn more about RAM selection strategies.
PCIe Riser Cards and GPU Installation
Some ITX cases mount the GPU parallel to the motherboard using a PCIe riser cable. This saves space vertically but adds potential problems with signal quality and compatibility.
PCIe 4.0 riser cables work fine at 4.0 speeds if they’re good quality. Cheap risers cause random crashes, display errors, or force the GPU to drop to PCIe 3.0 speeds. For RTX 4060-4070 class cards, PCIe 3.0 versus 4.0 makes no performance difference. For higher-tier cards, it might.
If your case requires a riser cable, budget for a quality option. Companies like LinkUp and 3M make reliable risers. The $25 generic riser from Amazon will cause troubleshooting headaches that waste hours of your time.
Validate Component Compatibility
Before finalizing your ITX component choices, verify everything works together without clearance issues, thermal conflicts, or performance bottlenecks.
Building Process and Common Mistakes

Building in an ITX case is harder than ATX. There’s less room for mistakes, less space to fix problems, and the build order matters more because you can’t easily access components once others are installed.
Build Order That Actually Works
The temptation is to install the motherboard first because that’s how ATX builds work. In ITX, that approach creates problems. You can’t route cables behind a motherboard that’s already mounted. You can’t access M.2 slots with the GPU installed.
Here’s the order I use for every ITX build. It minimizes backtracking and component removal:
Test before GPU installation: Power on the system and verify it posts to BIOS before installing the graphics card. This confirms CPU, RAM, motherboard, and PSU work. Troubleshooting in a fully assembled ITX case is miserable.
Cable Management Strategy
Cable management in ITX isn’t about making things pretty. It’s about making things fit and maintaining airflow. Pretty is a bonus if you achieve it without compromising function.
Velcro cable ties work better than zip ties in ITX builds. You’ll open this case again to add components, troubleshoot, or clean dust. Cutting zip ties every time is tedious. Velcro straps are reusable and adjustable.
Critical Cable Routes
- 24-pin motherboard: Route along case edge, not across the middle
- 8-pin CPU: Behind motherboard tray if possible
- GPU power: Straight connection with minimal bending
- SATA cables: Flat against case walls, not blocking airflow
Common Routing Mistakes
- Cables bunched in front of intake fans
- GPU power cable forced into sharp bend
- USB 3.0 header cable blocking RAM slots
- Fan cables routed through GPU heatsink area
Thermal Testing After Assembly
Don’t just build the system and assume it works properly. Run stress tests to verify thermals are acceptable before you finalize the build.
Use Prime95 for CPU stress testing and FurMark or 3DMark stress test for GPU. Run both separately for 20 minutes each. Monitor temperatures with HWiNFO64. If anything hits 90°C+, you have a cooling problem to address.
| Component | Idle Temp | Gaming Load | Stress Test | Action Needed |
| CPU | 35-45°C | 60-75°C | 75-85°C | 85°C+: Check cooler mount, improve airflow |
| GPU | 30-40°C | 65-80°C | 75-85°C | 85°C+: Undervolt, add case fans |
| VRM | 40-50°C | 70-90°C | 85-100°C | 100°C+: Direct airflow to VRM area |
| M.2 SSD | 35-45°C | 50-70°C | 60-75°C | 75°C+: Add heatsink, relocate drive |
Don’t skip thermal testing: I’ve seen builders complete a perfect-looking ITX build, then discover thermal throttling during their first gaming session. Testing takes 40 minutes. Rebuilding to fix cooling problems takes hours. Learn more about identifying and fixing performance issues.
Common Mistakes People Make
After helping troubleshoot dozens of ITX builds, certain mistakes appear constantly. Here’s what actually goes wrong:
- Forgetting motherboard standoffs: The board shorts against the case. Intermittent crashes drive you insane before you find the cause.
- Not testing RAM at XMP/EXPO speeds: System works fine at default speeds, crashes randomly when you enable XMP. Testing before final assembly saves hours.
- Installing GPU before connecting all motherboard headers: Front panel connectors become unreachable. You’re removing the GPU to plug in a USB header.
- Ignoring CPU cooler orientation: The cooler works but exhausts hot air directly into your PSU intake. Rotating it 90° fixes the problem.
- Not planning for future GPU upgrades: Today’s 200W GPU fits perfectly. Next year’s 280W upgrade doesn’t fit or overheats everything.
Documentation saves time: Take photos of your cable routing before GPU installation. When you upgrade components in six months, you’ll have a reference for how cables were positioned. This simple step eliminates 30 minutes of trial-and-error cable routing.
Performance Optimization for ITX Builds

An ITX build that runs hot performs worse than the same components running cool in a larger case. Thermal throttling steals performance you paid for. Optimization recovers it.
BIOS Settings for Thermal Management
Default BIOS settings assume you have good cooling. ITX cases don’t have good cooling—they have adequate cooling if you’re lucky. Adjusting power limits and fan curves makes a huge difference.
AMD Ryzen processors use PBO (Precision Boost Overdrive) to automatically overclock based on thermal headroom. In a spacious case with a 280mm AIO, PBO is great. In an ITX case with a 120mm AIO, PBO causes unnecessary thermal throttling.
CPU Optimization Steps
- Disable PBO or set conservative limits (150W max)
- Set fixed voltage instead of auto (reduces heat spikes)
- Lower boost clock limits by 100-200 MHz
- Configure aggressive fan curves (temperature priority over noise)
- Enable thermal monitoring thresholds for safety
Expected Performance Impact
Limiting a 7800X3D to 4.9 GHz instead of 5.0 GHz reduces gaming performance by 2-3%. It reduces temperature by 8-10°C. The thermal headroom allows sustained performance instead of boost-throttle cycles.
You’re trading 3% theoretical peak performance for 15% more consistent real-world performance. Easy trade in thermal-constrained builds.
GPU Undervolting and Power Limits
I keep mentioning GPU undervolting because it’s the single most effective optimization for ITX builds. It costs nothing, takes 20 minutes, and provides immediate temperature reduction.
Modern GPUs boost until they hit power or thermal limits. In good cooling, power limit comes first. In ITX cases, thermal limit comes first, which means the GPU throttles below its potential. Undervolting raises the thermal ceiling without adding cooling hardware.
Undervolting step-by-step: Open MSI Afterburner. Press Ctrl+F to open voltage-frequency curve. Find your GPU’s maximum stable frequency (usually 2700-2900 MHz). Select that point on the curve. Drag all points to the right of it down to the same voltage. Apply and test. If stable, reduce voltage by 10mV increments until unstable, then add 20mV back for safety margin. Detailed guide available at GPU optimization resources.
Fan Curve Configuration
Default fan curves prioritize silence over cooling. That’s fine for normal cases. ITX cases need aggressive fan curves that respond quickly to temperature changes.
Set your case fans to 40% at 50°C, 60% at 65°C, 80% at 75°C, and 100% at 80°C. Yes, the system will be louder under load. It will also maintain 10-15°C lower temperatures, which prevents throttling.
Quiet-Focused Curve
- 30°C: 20% fan speed
- 50°C: 35% fan speed
- 70°C: 50% fan speed
- 80°C: 75% fan speed
- Silent most of the time
- Higher sustained temperatures
Performance-Focused Curve
- 30°C: 30% fan speed
- 50°C: 50% fan speed
- 70°C: 75% fan speed
- 80°C: 100% fan speed
- Noticeably louder under load
- Significantly better thermals
The performance curve works better for ITX gaming. Your case sits on your desk, not in another room. A few extra decibels during gaming sessions prevents thermal problems that degrade long-term performance.
Monitoring and Adjustment
Install HWiNFO64 and configure it to log temperatures during your normal gaming sessions. After a week of gaming, review the logs to see actual thermal behavior.
If CPU temperature stays below 75°C, you can relax power limits slightly for more performance. If GPU hits 83°C+ regularly, you need more aggressive undervolting or improved case ventilation. Real data beats assumptions.
Optimize Your Complete System
After building your ITX PC, verify there are no hidden bottlenecks limiting performance. Check CPU-GPU balance, thermal constraints, and system stability.
The Bottom Line
Building a powerful ITX gaming PC without overheating requires component selection priorities completely different from standard builds. Thermal constraints aren’t problems to solve after the fact—they’re design parameters that determine every choice you make.
The CPU matters less than its thermal output. The GPU matters less than how it exhausts heat. The case matters less than its cooling support. Every component choice impacts every other component’s thermal environment. This interconnection demands upfront planning that most build guides skip.
ITX builds aren’t for everyone. They cost more per unit of performance than ATX equivalents. They restrict future upgrades. They require more research and careful component matching. But for the right use case—desk space constraints, frequent portability needs, or aesthetic preference for compact setups—they deliver desktop performance in laptop-adjacent form factors.
The key insight is that thermal density, not component power, determines ITX build success. A modest 7600X and RTX 4060 Ti can outperform a flagship 7950X and RTX 4080 in actual gaming if the former stays cool while the latter throttles. Component selection based on thermal output rather than benchmark scores produces better real-world results.
Start conservative: Your first ITX build should use mid-tier components with known thermal efficiency. The 7800X3D and RTX 4070 combination works in almost any ITX case. After building that successfully, you understand the thermal challenges enough to attempt more aggressive configurations.
Frequently Asked Questions
Is water cooling required for ITX gaming builds?
No. Quality low-profile air coolers handle 95W TDP processors effectively in most ITX cases. Water cooling becomes necessary only with high-power CPUs (150W+) or in cases with extremely limited cooler height clearance (under 55mm). A Noctua NH-L12S cools a 7600X or 7800X3D adequately in typical gaming workloads. Liquid cooling offers more thermal headroom but adds cost, complexity, and pump noise.
The real question is whether your processor choice requires water cooling. If it does, you’ve probably chosen too powerful a CPU for your ITX thermal constraints. Lower TDP processors with air cooling often deliver better real-world gaming performance in small form factor cases.
Can I use a full-size GPU in an ITX case?
Case-dependent. Some ITX cases like the Lian Li O11 Dynamic Mini support full-length GPUs up to 360mm. Ultra-compact cases like the Dan A4-SFX limit you to 305mm cards. Physical length is only part of compatibility—you must also account for power cable clearance (add 35-45mm for 12VHPWR adapters) and card thickness (many ITX cases only support 2-slot cards).
More importantly, just because a GPU physically fits doesn’t mean it thermally performs well. A 350W RTX 4090 in a 15-liter ITX case will thermal-throttle brutally regardless of physical clearance. Match GPU power draw to case thermal capacity, not just dimensions.
How much more expensive is an ITX build compared to ATX?
Expect 15-25% price premium for equivalent performance. ITX motherboards cost $180-300 versus $140-220 for ATX equivalents. SFX power supplies add $20-50 compared to ATX units of the same wattage and efficiency. Quality ITX cases start at $120 versus $80 for good ATX cases. Custom cable sets add another $80-120 if needed.
The performance-per-dollar equation favors ATX. The trade-off is space efficiency and portability. If desk space isn’t limited and you don’t move the system frequently, ATX delivers better value. Learn more about making informed build decisions.
Will my components thermal throttle in an ITX case?
Depends entirely on component power draw versus case cooling capacity. A 65W CPU and 200W GPU in an 18-liter case with good airflow won’t throttle. A 150W CPU and 350W GPU in a 12-liter case with poor ventilation absolutely will throttle. The answer isn’t “yes” or “no”—it’s “what specific components in what specific case?”
Use a bottleneck calculator that accounts for thermal constraints to validate your component choices before purchasing. Test temperatures after building using Prime95 and FurMark. If anything hits 90°C+ under stress testing, you need better cooling or lower-power components.
What’s the best ITX case for first-time builders?
The Lian Li O11 Dynamic Mini or Cooler Master NR200. Both offer excellent cooling support, good build quality, and enough internal space to work comfortably. They’re 18-20 liters, which isn’t ultra-compact but provides thermal headroom for learning ITX building without fighting extreme space constraints.
Avoid sub-12-liter cases for your first ITX build. The difficulty spike from 20L to 10L cases is massive. Master the thermal management principles in a forgiving case before attempting ultra-compact builds that demand perfect component selection and cable management.
How do I improve airflow in an already-built ITX PC?
Start with software solutions: undervolt GPU, limit CPU power targets, create aggressive fan curves. These cost nothing and often reduce temperatures by 8-12°C. Next, improve cable management—bundle and route cables away from fan intake and exhaust paths. Poor cable routing can block 25-30% of airflow in tight ITX cases.
If software and cable management don’t solve thermal issues, consider hardware upgrades: add case fans if mounts are available, upgrade to a better CPU cooler within your clearance limits, or replace thermal paste on CPU and GPU. Last resort: component replacement with lower TDP alternatives. A 7600 instead of 7700X drops 40W heat output, which matters significantly in space-constrained builds. Check out troubleshooting guides for systematic diagnosis.
Should I undervolt my GPU in an ITX build?
Yes, always. Undervolting reduces GPU temperature by 8-15°C with zero performance loss if done correctly. Modern GPUs run at higher voltages than necessary for their boost clocks because manufacturers prioritize guaranteed stability across all silicon quality variations. Your specific GPU likely runs stable at 50-100mV less than stock voltage.
Use MSI Afterburner’s voltage-frequency curve editor to find your GPU’s maximum stable frequency at reduced voltage. The process takes 20-30 minutes of testing but provides permanent thermal benefits. In ITX builds where every degree matters, undervolting is non-negotiable optimization that should happen immediately after build completion.
ITX builds represent PC building on hard mode. Thermal physics doesn’t care about your aesthetic preferences or space constraints. Heat density in small volumes demands respect and planning that casual builders often skip.
The reward for mastering ITX constraints is a compact powerhouse that delivers desktop gaming performance in a fraction of standard tower volume. Whether that trade-off makes sense depends on your specific use case and willingness to carefully optimize every component choice around thermal management rather than raw performance numbers.
Plan Your Complete ITX Build
Ready to build? Verify your component choices won’t create bottlenecks or thermal problems. Check system balance, compatibility, and performance expectations before ordering parts.
Build smart. Build cool. Build ITX properly.